Earlier we posted a list of the 20 Best Discord Bots for any Server in 2021. Today let’s see How to make a Discord Bot in 2021.
Discord bots in simple words are the AI bots that execute many handy tasks and the commands on the server you are working for example a greeting message to the new member, moderation of content and the most important is banning the breakers of the rule on your server.
It also helps you to build and use Discord server bots, which are automated users that carry out through the actions of a developer. In an era where gaming is on the rise, a huge amount of people enjoy games and are curious about new games.
But Communication and community revolve around games has a vital place. You can do all of these things with Discord, and in a more imaginative way. In this blog, I’ll reveal the secrets of how to build a Discord bot in Python so that you can get the most out of this incredible platform.
Table of Contents
What does Discord mean?
For gamers, Discord is a voice and text interaction platform.
Discord is used by players, streamers, and developers to talk about sports, answer questions, chat while playing, and many more. There’s also a gaming store with critical feedback and a premium package. For the lovers of games, it’s like a one-stop store.
Although Discord’s APIs can be used to construct a lot of this, this blog will help you out to learn something new i.e.: how to develop a Discord bot (Using Python).
Now we knew what discord is but what does a bot actually mean? Before moving forward knowing about what a Bot actually means will help you out.
What is a Bot?
People are getting more interested in Discord as time passes. As a result, an automated process that involves blocking problematic users and responding to user requests is essential for a community to survive and evolve.
Bot users are automated systems that look and behave like users and react to events and commands on Discord automatically. Users with Discord bots (or simply bots) have almost limitless options.
Let’s imagine you’re in charge of a new Discord guild and a new user enters for the first time. If you’re feeling very enthusiastic, you should directly reach out to the individual and invite them to your group. You may even inform them of the networks or request that they present themselves.
The user feels accepted and likes the conversations in your guild, so they invite their mates. Your guild’s community expands to the point that it’s no longer possible to individually reach out to every new member, but you also want to give them something to acknowledge their arrival. With the assistance of a bot, it became possible that you’ll automatically reach out to every new member when they join the community created by you.
You can also monitor how it communicates with each new user by customizing its actions depending on context. This is awesome, but it’s just one example of how a bot can be helpful. If you learn how to create bots, there are a lot of different ways to be imaginative with them.
I hope you are very much aware of the Discord and Bots. So now let’s head towards “ How you can create a Discord bot?” For this part, you must have some sort of programming language knowledge because you are creating something that will be beneficial for you as well as for others.
I will teach you how you can create a Discord bot using Python. For the creation of a Discord bot there are a number of micro-steps and tools that I am going to follow, use and teach you that include the Discord API, Libraries of Python, and a platform for cloud computing known as Repl.it.
As I have included that I am going to use the Python library and the Discord API but we can’t work on these platforms without any account registered there. So, firstly create a Discord Bot Account.
How to make a Discord Account
- Head on to the Discord Website
- Move towards the application page
- Tap on the “New Application” button.
- Give a name to the application and click “create”.
- Go to the “Bot” tab->click the “Add Bot” button. (Have a look at that your bot’s user would inherit your application’s name by default. Change the username to something more bot-like, like Tech2Stopbot, and Save Changes.)
- Confirm by clicking “Yes, do it!”.
Congratulations on your achievement! You created a Discord account. You will display details about your submission on the resulting screen. Remember that any software that communicates with Discord APIs, needs a Discord framework, not just bots. Bot-related APIs make up a small portion of Discord’s overall GUI.
Navigate to the Bot tab on the left-hand navigation list, as this tutorial is about how to make a Discord bot.
Keep Public Bot (checked) and Require OAuth2 Code Grant at their default settings
(unchecked).
Your bot is all set. You have created a bot but it’s worth zero if it does not interact with other users.
Next step, you need to create a guild (Community) for the interaction of your bot to the other users.
How to create a Guild
Guild (or in simple words a server, it is often known as Discord’s User Interface ) is a term used for the group or some channels where diverse users interact.
Let us imagine that you want to build a server where you want to have a chat with people about the latest game or an application. Now you need to create a Guild. Guild also has multiple channels, like:
Users will chat about anything they want in the general discussion channel.
Beware about spoilers: This channel is for people who have completed the game and want to chat about anything that happens at the end.
Announcements: This is a channel where you can post game announcements and have users discuss them.
- You’d allow other users to join your guild after you’d built it.
- So, go to your Discord home page and build a guild:
- You will browse and connect mates, direct messages, and guilds from this home page. To Add a Server, click the + icon on the left-hand side of the web page.
- Create a server and Join a Server is the two choices presented. In this scenario, choose Create a server and give your guild a name.
- You’ll be able to see the users on the right and the networks on the left until you’ve done creating your guild.
- The final move is to register your bot with your new guild on Discord.
Now the other step is How to connect a bot to the server
For this process you need to do some of the process that is mentioned below:
A bot cannot accept invitations in the same way that a user does. Instead, you’ll use the OAuth2 protocol to connect your bot. Return to the Developer Portal and link to the OAuth2 tab in the left-hand navigation: The OAuth2 URL Generator can be found in this browser.
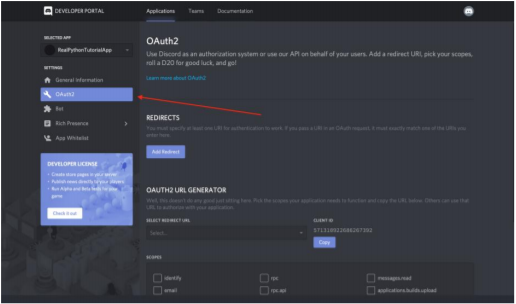
This tool creates an authentication URL that connects to Discord’s OAuth2 API and authorizes API access using the credentials from your application.
In this scenario, you’ll want to use your application’s OAuth2 credentials to allow your bot user access to Discord APIs.
Scroll down and pick bot from the SCOPES options, as well as Administrator from the BOT PERMISSIONS:
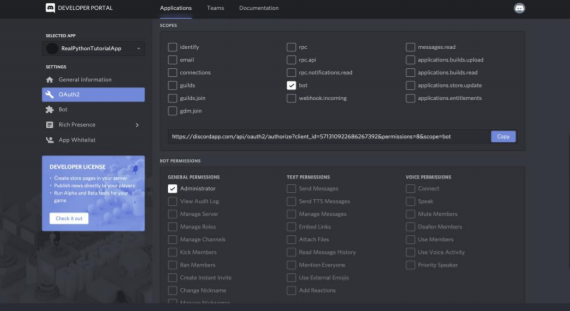
Discord has now created the authorization URL for your app, with the scope and permissions you specified.
Afterward, you need to click on the copy button that is beside the URL and paste it into the next tab and from the drop-down menu select your Guild.
Afterwards, Click on the Authorize and you are done.
Now, you have all the information that how you can create a bot using the developer option. The Next step is to implement your bot in Python.
Using Python
You need to use discord.py, as if you’re learning to create a bot with Python.
discord.py is Python’s Library that completely implements the APIs of Discord in an effective way. This involves using Python’s Async IO implementation. To get started, use pip to install discord.py.
After the installation of the discord.py, another step is to create connection to Discord.
Creating a Connection with Discord
The very first step is to create a connection of your bot to Discord. By using discord.py, you can do this process:
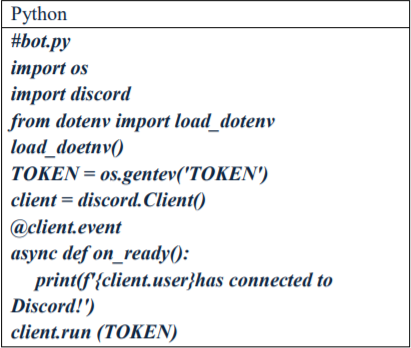
A Discord client is an entity that reflects a Discord relation. A client is a program that manages activities, monitors conditions, and communicates with Discord APIs in general.
Here, you’ve created a Client and implemented its on_ready() event handler command, which manages the event when the Client has formed a Discord Connection and has finished planning the data that Discord has sent, such as login status, guild, data channel, and more.
In other words, when the client is ready for further action, on ready() will be called (and the message will be printed).
When dealing with secrets, such as your Discord token, it’s best to read it from an environment variable into your software. Using context variables aids you in achieving the following goals:
- Keep the secrets out of source access.
- Without modifying the code, use various variables for construction and production environments.
If you could export DISCORD_TOKEN ={your-bot-token}, for this you need to save your file with the extension “.env” so that your code will run on all machines. This is not only more convenient so you won’t have to export your token any time you clear your shell, but it also prevents you from accidentally storing your secrets in the archives of your shell.
In the same directory as bot.py, create a file called.env:
Now what you will do is to replace {your-bot-token} with the token of your bot that you can get by heading back to the Bot page on the Developer Portal and tap on the Copy button under the TOKEN section.
Heading back to the bot.py code, you’ll find a library known as dotenv. This library is useful for the ones working with .env files.
Now for the environment variables from a .env file into your shell’s environment variables so that you can utilize it in your code.
Now install dotenv with pip.
client.run() runs by utilizing the token of your bot.
You can now run the code after setting up bot.py and.env.
Interaction of your bot
Another step is interaction of your bot. When you are using a client there are wide ways of Discord APIs.
Let’s presume you had to write the name and identifier of the guild for which your bot user was registered to the console.
You’ll need to create a new context variable first:
env #
DISCORD TOKEN={“your-bot-token”}
DISCORD GUILD={“your-guild-name”}
Bear in mind that the two placeholders must be replaced with real values:
{your-bot-token}
{your-guild-name}
Remember that once the Client has established a connection and prepared the details, Discord calls on ready(), which you used previously. As a result, you can count on guild data being available within on_ready():
#bot.py
import os
import discord
from dotenv import load_dotenv

load_dotenv()
TOKEN = os.getenv('DISCORD_TOKEN')
GUILD = os.getenv('DISCORD_GUILD')

client = discord.Client()

@client.event
async def on_ready():
    for guild in client.guilds:
        if guild.name == GUILD:
            break

print( f'{client.user} is connected to the guild:\n' f'{guild.name}(id: {guild.id})' )

client.run(TOKEN)
You looped through the guild data sent to the client by Discord, including client. guilds. Then you checked for the guild of the same name as you did before printing a formatted string to stdout. Run your program to see the results.
Your bot’s name, your server’s name and server’s identification number is now visible.
The list of guild members is another interesting piece of information you might get from a guild. The detailed code is below:
#bot.py
import os
import discord
from dotenv import load_dotenv

load_dotenv()
TOKEN = os.getenv('DISCORD_TOKEN')
GUILD = os.getenv('DISCORD_GUILD')
client = discord.Client()

@client.event
async def on_ready():
    for guild in client.guilds:
        if guild.name == GUILD:
            break

print( f'{client.user} is connected to the following guild:\n' f'{guild.name}(id: {guild.id})\n' )

members = '\n - '.join([member.name for member in guild.members])

print(f'Guild Members:\n - {members}')
You got the names of all the guild members by looping around guild.members and printing them with a formatted string.
When you run the application, you can see the name of the account that you used to build the guild, as well as the name of the bot user.
Now the next step is to learn how you can customize the functions of utility that your bot will perform I will put one of the example so that you can understand.
Utility Function of a Bot
This is the last section of this blog in which the name and identifier the guild of bot will be printed using the code clarified below:
#bot.py
import os
import discord
from dotenv import load_dotenv

load_dotenv()
TOKEN = os.getenv('DISCORD_TOKEN')
GUILD = os.getenv('DISCORD_GUILD')
client = discord.Client()

@client.event
    async def on_ready():
        for guild in client.guilds:
            if guild.name == GUILD:
                break

print(f'{client.user} is connected to the following guild:\n'f'{guild.name}(id: {guild.id})')

client.run(TOKEN)
Its upto you, you can clean up this code by utilizing some functions available in discord.py.
By replacing the for loop with an intuitive, abstracted function, discord.utils.find() will boost the simplicity and readability of this code:
#bot.py
import os
import discord
from dotenv import load_dotenv

load_dotenv()
TOKEN = os.getenv('DISCORD_TOKEN')
GUILD = os.getenv('DISCORD_GUILD')
client = discord.Client()

@client.event
    async def on_ready():
        guild = discord.utils.find(lambda g: g.name == GUILD, client.guilds)
        print(f'{client.user} is connected to the following guild:\n'f'{guild.name}(id: {guild.id})')

client.run(TOKEN)
find() takes a predicate, which is a function that defines a feature of the component in the iterable that you’re looking for. As the predicate, you used a specific kind of anonymous function known as a lambda.
You’re trying for a guild of the same title as the one you saved in the DISCORD GUILD context variable. When find() detects an element in the iterable that follows the predicate, it returns the element. This is exactly the same as the previous example’s split comment, except it’s cleaner.
With the get() utility, discord.py has taken this definition a step further:
#bot.py
import os
import discord
from dotenv import load_dotenv

load_dotenv()
TOKEN = os.getenv('DISCORD_TOKEN')
GUILD = os.getenv('DISCORD_GUILD')
client = discord.Client()

@client.event
    async def on_ready():
        guild = discord.utils.get(client.guilds, name=GUILD)
        print(f'{client.user} is connected to the following guild:\n'f'{guild.name}(id: {guild.id})')

client.run(TOKEN)
get() finds the iterable and certain keywords arguments. The keyword arguments are properties of the iterable elements that must all be resolved in order for get() to return the element. Now you are aware of the name=GUILD as the characteristic that must be met.
Responding to Messages
This is the foremost function of a bot to respond to the messages of the users, we are now inhibiting some commands in our bot so that it can respond to the messages automatically, you can also use welcome message or automated replies through your bot but for that the command alters according to the specification. Here, I am going to tell you how you can respond to the messages. You need to add a function or an event named as on_message. This occurs when any message is posted in a community where your bot is also joined or has access.
Example code is below.
@client.event
async def on_message(message):
    if message.author == client.user:
        return

    brooklyn_99_quotes = ['I\'m the human form of the �emoji.', 'Bingpot!', ( 'Cool. Cool cool cool cool cool cool cool, ' 'no doubt no doubt no doubt no doubt.' ), ]
    if message.content == '99!':
        response = random.choice(brooklyn_99_quotes)
        await message.channel.send(response)
The majority of this event handler examines the message.content, checks to see if it equals ’99!,’ and, if it does, responds by sending a random quote to the message’s channel.
The other point to consider is this:
if message.author == client.user:
    return
Because a Client can’t tell the difference between a bot and a regular user account, your on message() handler should guard against a recursive situation in which the bot sends a message that it might handle.
Let’s say you want your bot to listen for users saying “How is your day” to each other. This is how you could write your on_message() handler:
@client.event
async deg on_message(message) :
    if 'how are you' in message.content.lower():
        await message.channel.send ('how are you?')
This event handler not only has a potentially spammy nature, but it also has a terrifying side effect. The bot’s response message contains the same message that it will deal with!
So, if someone in the channel asks someone a “How are you?” the bot will respond… again… and again… and again: So, what are your plans for resolving these issues? Don’t worry, I’ll show you how to do it. Firstly you need to compare the message.author with client.user (bot user), and you need to ignore its own messages.
Now head over to the code to fix this:
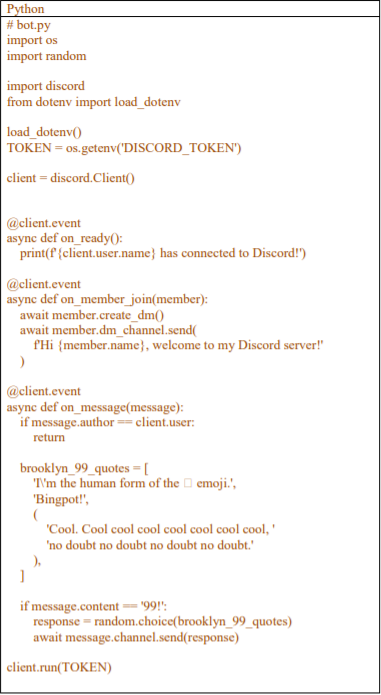
Since the on message() handler uses random.choice, don’t neglect to import random at the top of the module ().
Now,run the software as follows:
At last, head over to the Discord to test this process.
Hurrah, now you know how you can respond to the messages. Now head towards connecting a bot.
Connecting a Bot
This is the last process and one of the main processes of the creation of a Bot. A Bot is a Client subclass that has some additional functionality that is helpful when building bot users. A Bot, for example, can manage events and instructions, as well as perform validation tests.
Convert bot.py to use a Bot instead of a Client before diving into the Bot features:
#bot.py
import os
import random
from dotenv import load_dotenv
#1
from discord.ext import commands
load_dotenv()
TOKEN = os.getenv('DISCORD_TOKEN')
#2
bot = commands.Bot(command_prefix='!')
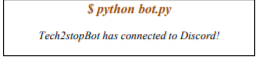
@bot.event
async def on_ready():
print(f'{bot.user.name} has connected to Discord!')
bot.run(TOKEN)
As it is visible from the above code, that a Bot is also able to manage events just like a client does. But there’s a difference among bot and a Client:
- Bot is imported from the discord.ext.commands module.
- A command prefix is required by the Bot initializer.
The extensions library, ext, contains number of useful component for building a Discord bot.
Conclusion
Now you have enough knowledge about how to create a discord bot using Python. In this post you have learned a lot about the creation of discord bots. In this post we have learned about:
- What does Discord mean?
- What is a Bot?
- How to make a Discord Account?
- How to Create a Guild and what does Guild mean?
- How to connect a bot to the server?
- How to implement a bot in Python?
- Creating a Connection with Discord
- Interaction of bot
- Utility function of a bot
- Responding to Messages
- Connecting a Bot
There are lots and lots of other things that you can add to your bot using the discord.py library. In this bot, a basic bot creation is told. If you want to add more features to your discord bot then you should head over to the docfordiscord.py.
Lastly here’s a great video tutorial to help you out.